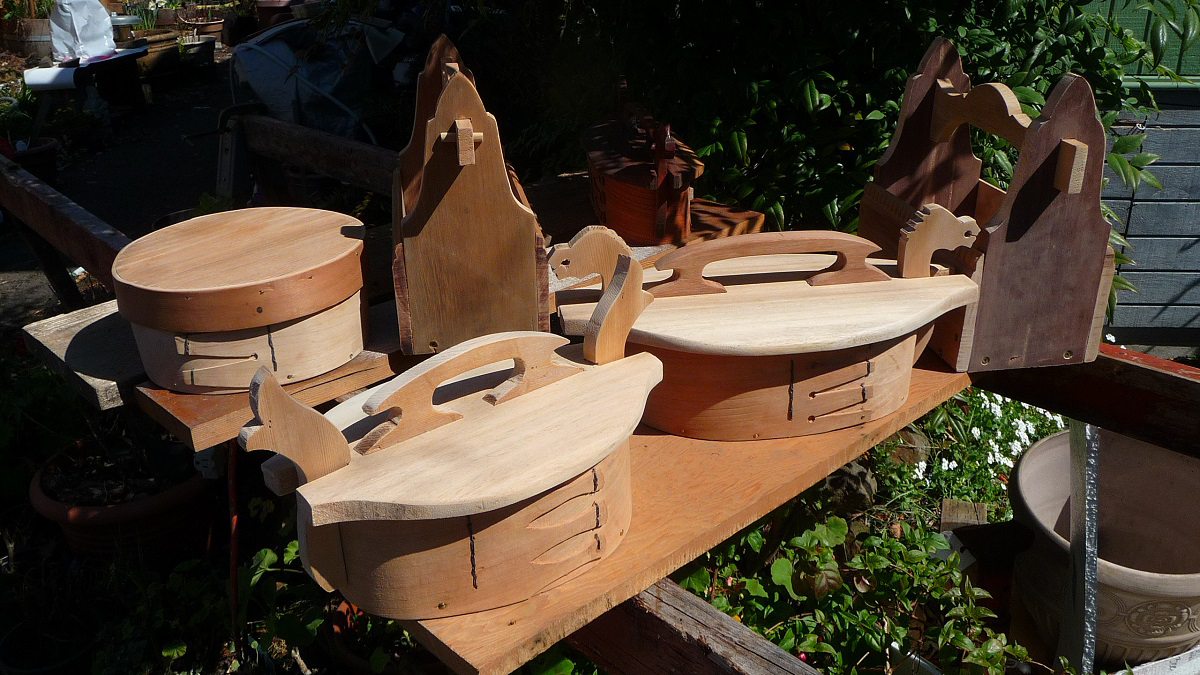
Here are the instructions in making these beautiful tine boxes that are used all over northern Scandinavia as a lunch pail or for the transport of provisions. If you are traveling the Eugene Airport between April 13 – July 11, 2023 visit our Habitat display at the top right of the main escalators to see some of these tines in person.
Directions from Pat:
Design the Tine.
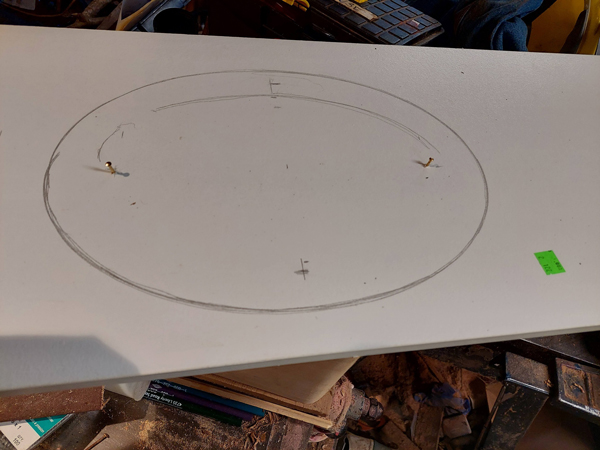
Determine the circumference and height . For example for an elliptical box I set a focus of 9 inches and a minor axis of 3.5 . on a piece of scrap plywood drive nails in at the focus and use a loop of string to draw the ellipse.( google how to draw an ellipse.) Use the scrap plywood to cut out the ellipse for a pattern. ( it will be used to cut your base and to built your steaming form.
This gives close to a 30 inch circumference, I chose under 5.5 veneer width so I can construct a soaking box using 2 by 6 nominal scrap. wider veneer (taller box) will require a bigger bending frame and will take longer to make, and it will be heavier
Cut your veneer to 1/ 8 thick and longer than 30 inch — 36 inches will give a 6 inch overlap which works well
Cut the Veneer
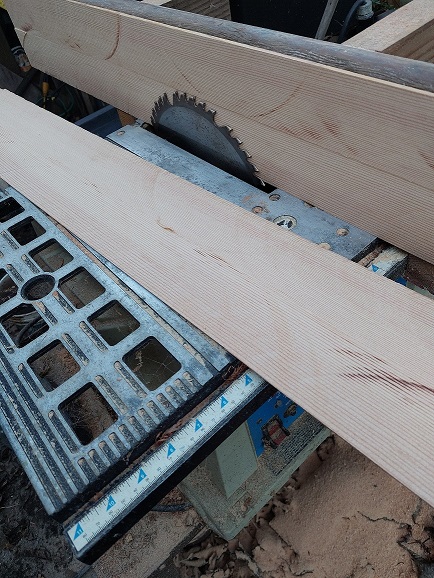
Use vertical grain if you can find it. Cedar or oak or ash or cherry or doug fir can be used.
Design the fingers for the lap joints. Assume some failures so make a template for the fingers if you need to repeat a process.
Cut the fingers in the veneer now.
Make a veneer soaking box
Dry wood will not steam well. I soak the veneer for several days before I steam it.
All you need to do is make a simple box big enough to hold your veneer strips. I use some old vinyl sheet to line the box so it is water tight. Much easier than to make a water tight box. fill the box with water. Use clean rocks to hold the veneer submerged. Keep anything iron away from the veneer when it is wet or it will stain black. (oak particularly)
Make the steamer
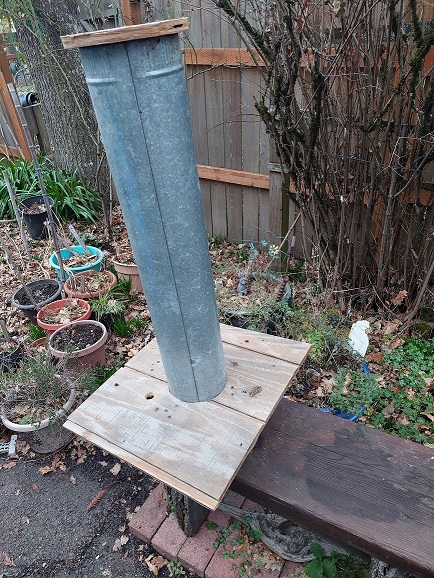
I attach course screen on the bottom of a stove pipe ( allows circulation of water through out the steamer. Screen 2 inches wide, 1 inch extends below end of pipe.
I use an old “good will” pressure cooker for the vessel. I have a secure fitting wood cover with a tight fitting hole to fit the stove pipe, The brace pieces also hold the pipe into the kettle.
The stove pipe has a series of holes drilled about an inch below the cover ( lets the steam circulate and keeps equal pressure inside the kettle.
there is a hole in the wood kettle top for a dip stick to monitor water lever and also to add more water for longer steaming sessions. seal with a cork during steaming.
A fitted wooden top sits on the top of the pipe. It has a 1/2 inch hole to let the steam out. ( moving steam works best in a steam box. )
I use a Coleman camp stove or any other small stove (gaz works well also). An electric hot plate dose not have the btu power to steam efficiently.
Make a steaming form
Bending wood takes a lot of water , fire, and persuading wood into a shape it doesn’t want to take. woodworkers usually use a bending strap that helps keep the wood compressed and avoid splitting. ( boat building articles cover this a lot). It also allows applying bending pressure evenly around the form
You will want to build a bending form.
Use the elliptical pattern and cut several layers of 2 by 6 in a cross hatch pattern. Screw and glue this together rasp or sand it smooth.
Cut a 48 inch piece of flashing to match the height of the bending form. use the form from step 1 to establish your start and end points to wrap the veneer. You want the fingers to lay on the flat of the oval.
At the inside start point draw a radial line 1.5 inch long. At the inside end of this line drill a 3/8 hole straight through the form. Cut a kerf from the starting point to the drilled hole you just made.
Cut a detent the thickness of the veneer, out from the kerf gradually tapering out several inches . This allows the pieces of veneer to lay flat to the lapping point.
The flashing is folded back over itself (critical it be a right angle) at about 1 inch. put a gutter spike in the folds crease and hammer the flashing to close tightly over the spike. slip the flashing and gutter spike through the hole and kerf . use a shim the thickness of the veneer and hammer a bend where the veneer will seat.
Now you can start the construction
Set up Steamer
- Have enough propane on hand and spare water.
- Fill up water and bring to rolling boil with steam pouring out of hole in top of pipe
- Wear gloves and wrap loose string around veneer and put into pipe and cover the pipe
- Steam for 20 minutes and pull out by string
- Fit end without fingers into steaming form and start rolling flashing veneer sandwich.
- When veneer is inside flashing wrap to end of flashing and clamp closed
- Let set overnight. this minimizes the chance of splitting and lets the wood adapt to new shape.